Saturday, October 10, 2015

Custom UISwitch in iOS

I wanted to create Custom UISwitch in my iOS game. Initially I just waned to change size, font and color and for that I used UICustomSwitch from Hardy Macia found at here. It's quite easy to use and customisable, but then I wanted to switch to use custom image instead of standard one. For that I need to modify code a bit, below is the code which use custom image to create UISwitch. BTW this is how it looks


Header is same as original implementation, but I removed unnecessary properties and added left and right images required to display on and off images for switch.
@interface UICustomSwitch : UISlider {
    BOOL on;
    UIImageView* leftImage;
    UIImageView* rightImage;
 
    BOOL touchedSelf;
}

@property(nonatomic,getter=isOn) BOOL on;
@property (nonatomic, retain) UIImageView* leftImage;
@property (nonatomic, retain) UIImageView* rightImage;

- (void)setOn:(BOOL)on animated:(BOOL)animated;

@end
Now lets see implementation. Below is code for initialising the UISwitch with custom rect. You can also see we are adding On and Off image as left and right subview to switch.
-(id)initWithFrame:(CGRect)rect
{    
    if ((self=[super initWithFrame:rect])) {
 [self awakeFromNib];
    }
    return self;
}

-(void)awakeFromNib
{
    [super awakeFromNib];
 
    self.backgroundColor = [UIColor clearColor];
    
    [self setThumbImage:[Util imageNamed:@"switch"] 
        forState:UIControlStateNormal];
    [self setMinimumTrackTintColor:[UIColor clearColor]];
    [self setMaximumTrackTintColor:[UIColor clearColor]];
    
    self.minimumValue = 0;
    self.maximumValue = 1;
    self.continuous = NO;
 
    self.on = NO;
    self.value = 0.0;
 
    self.leftImage = [[UIImageView alloc] initWithFrame:self.frame];
    self.leftImage.image = [Util imageNamed:@"on"];
    [self addSubview: self.leftImage];
    [self.leftImage release];
    
    self.rightImage = [[UIImageView alloc] initWithFrame:self.frame];
    self.rightImage.image = [Util imageNamed:@"off"];
    [self addSubview: self.rightImage];
    [self.rightImage release];
}

Now you should be able to see UISwitch with custom images, we now need to add code required to on and off switch from code and change image accordingly.
- (void)setOn:(BOOL)turnOn animated:(BOOL)animated;
{
    on = turnOn;
 
    if (animated) {
 [UIView beginAnimations:@"UICustomSwitch" context:nil];
 [UIView setAnimationDuration:0.2];
    }
 
    if (on) {
 self.value = 1.0;
        self.rightImage.hidden = YES;
        self.leftImage.hidden = NO;
    } else {
 self.value = 0.0;
        self.rightImage.hidden = NO;
        self.leftImage.hidden = YES;
    }
 
    if (animated) {
 [UIView commitAnimations]; 
    }
}


Now finally we also have to add code to enable interaction.
- (void)endTrackingWithTouch:(UITouch *)touch withEvent:(UIEvent *)event
{
    [super endTrackingWithTouch:touch withEvent:event];
    touchedSelf = YES;
    [self setOn:on animated:YES];
}

- (void)touchesBegan:(NSSet*)touches withEvent:(UIEvent*)event
{
    [super touchesBegan:touches withEvent:event];
    touchedSelf = NO;
    on = !on;
}

- (void)touchesEnded:(NSSet*)touches withEvent:(UIEvent*)event
{
    [super touchesEnded:touches withEvent:event]; 
    if (!touchedSelf) {
 [self setOn:on animated:YES];
 [self sendActionsForControlEvents:UIControlEventValueChanged];
    }
}
That's it, I hope this will help.

Sunday, August 16, 2015

The Math Game for iOS

If you have read my previous posts, you might already know I was trying to learn Swift language. While doing so I tried to create a simple game.

Finally I was able to complete the app and was able to publish it as well. You can download app from here.


Below is demo of the game.

You can also get more information about app here.

Friday, July 17, 2015

Displaying Game Centre Leaders board from Swift

In last post, I showed how we can authenticate local player and how we can post score to default leader board.

In this post, I will show how we can display leader board using swift gamekit API. Below code shows how we can display GKGameCenterViewController. Game center viewcontroller needs delegate, which is called when view is dismissed. Also we need parent viewcontroller which will be used to display GKGameCenterViewController.
func showLeaderboard(viewController: UIViewController, 
    gameCenterDelegate: GKGameCenterControllerDelegate) {
    let gameCenterVC: GKGameCenterViewController = GKGameCenterViewController();
    gameCenterVC.leaderboardIdentifier = defaultLeaderBoard;
    gameCenterVC.gameCenterDelegate = gameCenterDelegate;
    viewController.presentViewController(gameCenterVC, animated: true, completion: nil);
}
Now we have code that can display leader board, but we need to make our class conform to GKGameCenterControllerDelegate protocol and implement required method. Below is code for delegate method. Which simply dismiss presented view controller.
func gameCenterViewControllerDidFinish(gameCenterViewController: GKGameCenterViewController!) {
    gameCenterViewController.dismissViewControllerAnimated(true, completion: nil)
}
So, as you can see it's quite simple. Hope this will be helpful.

Friday, July 10, 2015

Creating array of IBOutlets of NSLayoutConstraint's from Swift in iOS

While working on my iOS app, I wanted to modify UI Constraint set from Interface Builder from Swift code.

Below video shows how we can create Array of IBOutlets using Interface Builder. Here I am creating array of NSLayoutConstraint, which I want to modify from Swift Code.


Now lets see how we can manipulate constraints from swift. First we need to define array of IBOutlet. Below code shows the same.
@IBOutlet var constraints: Array?
Now, once you connect IBoutlet from Interface Builder as shown in above video. You can use those. In below code I am modifying NSLayoutConstraint's constant value.
if( Utils.isIPad() ) {
    for constraint: NSLayoutConstraint in constraints! {
        if(Utils.isIPad()) {
            constraint.constant = 30
        }
    }
}
That's it, Thank you for reading.

Sunday, June 28, 2015

Posting score to Game Kit Leader board using swift

As you might already know, I recently started exploring Swift language and now I am trying out GameKit framework. While I have some experience in working with GameKit using Objective C. I wanted to do the same thing using swift. As such there are no API changes while using GameKit with Swift or Objective C. However there are some syntax change.

In this post, I will show how to Authenticate local player using GameKit framework and post score to LeaderBoard defined in iTune Connect Application setting.

Following is code snippet that shows how to Authenticate Local player. This function takes ViewController as argument. Login dialog will be displayed using this View controller. Rest will be taken care by GameKit framework.
func authenticateLocalPlayer(viewController: UIViewController) {
    let localPlayer: GKLocalPlayer = GKLocalPlayer.localPlayer()
    
    localPlayer.authenticateHandler = {(ViewController, error) -> Void in
        if((ViewController) != nil) {
            // 1 Show login if player is not logged in
            viewController.presentViewController(ViewController, animated: true, completion: nil)
        } else if (localPlayer.authenticated) {
            // 2 Player is already euthenticated & logged in, load game center
            self.isGameCenterEnabld = true                
        } else {
            // 3 Game center is not enabled on the users device
            self.isGameCenterEnabld = false
            println("Local player could not be authenticated, disabling game center")
            println(error)
        }
        
    }
    
}
Now we have authenticated local player. So when we are ready to post score to Leader Board. We can use below function. Here we are posting score to "defaultLeaderBoard". Which is identifier of Leader board defined in iTune connect App setting.

func submitScore( score: Int) {
    if( !isGameCenterEnabld ) {
        return;
    }
    
    var sScore = GKScore(leaderboardIdentifier: defaultLeaderBoard)
    sScore.value = Int64(score)
    
    let localPlayer: GKLocalPlayer = GKLocalPlayer.localPlayer()
    
    GKScore.reportScores([sScore], withCompletionHandler: { (error: NSError!) -> Void in
        if error != nil {
            println(error.localizedDescription)
        } else {
            println("Score submitted")
            
        }
    })
}
That's it. Hope this will be useful.

Saturday, June 27, 2015

Using NSNotificationCenter in Swift

NSNotificationCenter is a convenient method to implement Observer pattern in iOS, something similar to what we say Signal/Slot in Qt framework.

To register one self as observer to some event, you can use addObserver method form NSNotificationCenter. In below code you are adding self as observer, selector is method which will be called when event is triggered, name is name of event or notification in which we are interested in, and object is object from which we want to receive event from, nil means we are ready to receive event from any object.
NSNotificationCenter.defaultCenter().addObserver(
    self, 
    selector: "gameViewClosed", 
    name: "gameViewClosed", 
    object: nil);
Now to trigger the notification, you can use postNotificationName method from NSNotificationCenter. Following code shows the same. Here we are sending notification for "gameViewClosed" event, object nil mean deliver event to all interested objects.
NSNotificationCenter.defaultCenter().postNotificationName(
    "gameViewClosed", 
    object: nil);
That's it, thanks for reading.

Thursday, June 25, 2015

Playing sound using Swift

Posting small code snippet to that shows how to play sound using Swift in iOS.

First we need to import AVFoundation.
import AVFoundation
Then we need to create instance of AVAudioPlayer. I created a small utility function like below for the same.

private static func createAudioPlayer
( sound: String, type: String ) -> AVAudioPlayer {

    var error:NSError?;
    let soundUrl = NSURL(fileURLWithPath: NSBundle.mainBundle().pathForResource(sound, ofType: type)!);
    println(soundUrl)
    
    var player = AVAudioPlayer(contentsOfURL: soundUrl, error: &error);
    player.prepareToPlay();
    return player;
}

And this function can be used like below.
public init() {
    // Removed deprecated use of AVAudioSessionDelegate protocol
    AVAudioSession.sharedInstance().setCategory(AVAudioSessionCategoryPlayback, error: nil);
    AVAudioSession.sharedInstance().setActive(true, error: nil);
    
    correctAns = MusicHelper.createAudioPlayer("correctAns", type: "wav");
    wrongAns = MusicHelper.createAudioPlayer("wrongAns",type: "wav");
}
Now we can use AVAudioPlayer's play API to play the sound. Like below.

public func playCorrectAnsSound() {
    correctAns.play();
}

public func playWrongAnsSound() {
    wrongAns.play();
}

That's it, thanks for reading.

Sunday, June 7, 2015

Performing Segue and Passing data in iOS

I was trying to learn how to perform view switching using Segue for UI created by StoryBoard. Using Segue is quite easy and convenient. You can create Segue from Interface Builder, which associate action to view. Like if you click some button then you can associate this click action with view switch and you can select which view to switch to. This all is quite simple and can be done using simple drag and drop.

In case you want to perform view switch manually without any user interaction, you can call "performSegueWithIdentifier", like below. Here once my game is finished, I am calling "GameOverSegue", which will switch view to GameOver view.
self.performSegueWithIdentifier("GameOverSegue", sender: self)
If you want to pass some data while performing Segue, your calling ViewController needs to override "prepareForSegue" function. In this function you can set data to called view. Like below, I want to pass score to my GameOver view.
override func prepareForSegue(segue: UIStoryboardSegue, sender: AnyObject?) {
    if( segue.identifier == "GameOverSegue") {
        let gameOverVC: GameOverViewController = 
            segue.destinationViewController as! GameOverViewController;
        gameOverVC.setScore(self.score)
    }
}
Thanks, hope this will be helpful.

Saturday, June 6, 2015

Drawing round border around UIView in iOS

I wanted to create a subview UIView with round border in iOS. I found following code works very well to draw round border around UIView. While this code is written swift you can easily write similar code in Objective C as well.

Following is the code. As you can see, I selected subview UIView and made is IBOutlet using Interface Builder. Once that is done you can see round border around view.

@IBOutlet weak var contentView: UIView?
    
override func viewDidLoad() {
    super.viewDidLoad();
        
    contentView?.layer.borderWidth = 3.0
    contentView?.layer.borderColor = UIColor(red:102/255,green:102/225,blue:102/225, alpha:1).CGColor
    contentView?.layer.cornerRadius = 14
}
    
And following how it looks.

Friday, June 5, 2015

Hiding status bar in iOS8 using Swift

I recently started learning swift, while learning I started to create simple game. I wanted to make my game full screen, but I was unable to hide top status bar from Interface builder. No matter what I change that status bar was always visible.

Buf I found following code snippet, if you add this code in your View Controller file, you can easily hide status bar.
override func prefersStatusBarHidden() -> Bool {
    return true;
}
Following how my ViewController file looks after adding this code.
class ViewController: UIViewController {
        
    override func viewDidLoad() {
        super.viewDidLoad()
    }

    override func didReceiveMemoryWarning() {
        super.didReceiveMemoryWarning()
    }
    
    override func prefersStatusBarHidden() -> Bool {
        return true;
    }
}
That's it. Hope this will be hopeful.

Sunday, May 3, 2015

Color Animation using Animator with Unity3D

I created a small demo application to demonstrate how Animation can be done using Animator and State Machine with Unity5. This demo creates a Blinking Animation on Mouse click.

Following is final output of this demo.


Below post shows, how above animation can be created.

-> To begin, First create a simple cube and apply a material on the cube. Setup should look like below.

-> Then using "Add Component", add Animator to this cube.

-> Once Animator is added, open Animation window using "Window" -> "Animation", We will need to use while performing the animation.


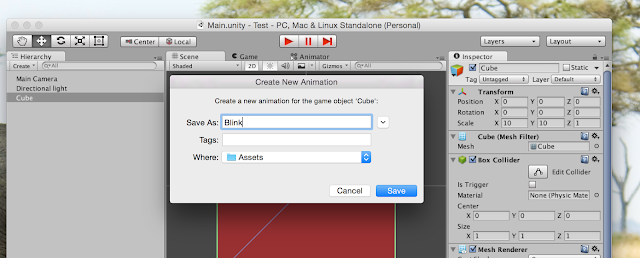
Animator performs animation using State Machine and this state machine should have default state. Animator will transit to this default State when object is created. In Animator, Animation clip is considered as a State, so lets add a Animation clip and name it default.


-> Our default state will not have any animation, it should show just initial color. Let's just add one frame with current color. Like below.


-> Now we have default state, let's add another state which will perform "Blinking" animation.


-> Now we should add frames, so let's add color property and frames to animate color.


After adding these frames color should animate like below.


-> Now we have Blinking animation state, we are now ready to create a State Machine. Open Animator window by clicking on "Animator" object, it should look like below.

-> We should now add a Parameter which will be used to Trigger animation. On "Animator" window add new boolean parameter and name it "blink".


Following video shows how to create transition and how to add condition to those transition.


-> Now we have state machine with transition and condition, but we want Blink Animation to terminate once its finished. Let's open "Blink Animation" and add Animation event line shown in below image.


This will prompt you to select function to be invoked when Animation frame is reached. You can select function from attached Script.


Following video shows the same process.


-> Finally, We also need to add a script to Cube object. Following is code for the script. In script we are setting "blink" transition parameter of Animator to true on mouse click. While StopAnimation sets "blink" parameter to false when animation event is called.

using UnityEngine;
using System.Collections;

public class MyAnimation : MonoBehaviour {

 private Animator animator;

 void Awake() {
  animator = GetComponent ();
 }

 void OnMouseUp() {
  startAnimation ();
 }

 public void startAnimation() {
  animator.SetBool ("Blink", true);
 }

 public void stopAnimation() {
  animator.SetBool ("Blink", false);
 }
}

And now if run project and click cube, you should see blink animation as per demo video. That's it hope this post will be helpful.

Sunday, April 12, 2015

Handling Drag and Drop with Unity 3D

Drag and Drop is quite useful and we need to implement this quite often in our project. While working on one of my Unity Project, I required to implement the same.

There are some options but I found code described in this post quite simple to use with my project. In this post I will describe how I achieved the same.

So, Let's first create a C# script, I named it Drag.cs and added following code to it. This script will enable touch interaction to added GameObject and will move object along with touch. Also add BoxCollider to GameObject, so we can detect collision.

using UnityEngine;
using System.Collections;
 
public class Drag : MonoBehaviour {
    private Plane plane;
    private Vector3 v3Offset;


    void OnMouseDown() {
 plane.SetNormalAndPosition
             (Camera.main.transform.forward, transform.position);
 Ray ray = Camera.main.ScreenPointToRay (Input.mousePosition);
 float dist;
 plane.Raycast (ray, out dist);
 v3Offset = transform.position - ray.GetPoint (dist);         
    }

    void OnMouseUp() {
    }

    void OnMouseDrag() {
 Ray ray = Camera.main.ScreenPointToRay (Input.mousePosition);
 float dist;
 plane.Raycast (ray, out dist);
 Vector3 v3Pos = ray.GetPoint (dist);
 transform.position = v3Pos + v3Offset;  
    }
}
Now, suppose we have another GameObject and we want to detect when GameObject we just created with above script, is dropped on it. To detect drop easily let's first add RigidBody to this GameObject and BoxCollider. After adding BoxCollider also check isTrigger is true. After doing this we need to add C# script to it which will handle drop. Let's name it to Drop.cs and add below code to it.

Below script observe the Collision. When collision happens it checks which object is collided with it. If collided object is Drag object then do something.
using UnityEngine;
using System.Collections;

public class Drop : MonoBehaviour {


    void OnCollisionEnter2D (Collision2D other) {
    }
 
    void OnCollisionExit2D(Collision2D other){
    }
 
    void OnTriggerStay2D (Collider2D other) {
        if( other.gameObject.tag == "Drag" ) {
            // Object dropped, handle the drop
        } 
    }
} 
That's pretty much it, hope this helps.

Saturday, April 4, 2015

Sprite with Text in Unity3D

I am working on one game where I wanted to show text over sprite. With new Unity UI System, it's quite easy to create button as sprite and text over it.

But if you want to create a traditional sprite and add text to it, this post describes the same.

Basic idea is to add 3D text component to sprite, but if you have tried it then you might know after adding 3D text component we need to move it to same sorting order as sprite. Also we need to layout text properly to set alignment.

Before we begin, I assume you know how to create Sprite, how to create 3D text component and make it a Prefab object. If not you can refer this article to know how to make Prefab object.

Finally, following is my script which I attached to Sprite. Once added to Sprite, It will create 3D text component from provided Prefab object and add the same to Sprite.
using UnityEngine;
using System.Collections;
 
public class TextScript : MonoBehaviour {
 
 public string text;
 public GameObject textPrefab;
    
 void Start() {
  GameObject text = Instantiate(textPrefab) as GameObject;
  text.transform.parent = gameObject.transform;
  text.transform.rotation = gameObject.transform.rotation;

  TextMesh textInstance = text.GetComponent();
  textInstance.text = text;

  Renderer textRenderer = text.GetComponent ();
  Renderer thisRenderer = GetComponent ();

  textRenderer.sortingLayerID = thisRenderer.sortingLayerID;
  textRenderer.sortingOrder = thisRenderer.sortingOrder+1;
 
  Bounds textBounds = textRenderer.bounds;
  Bounds parentBounds = thisRenderer.bounds;
  
  float x = gameObject.transform.position.x 
                     - (textBounds.size.x/2); 
  float y = gameObject.transform.position.y 
                     + (textBounds.size.y/2);
  textInstance.transform.position = 
                     new Vector3(x, y, parentBounds.center.z + 1);
 }
}
That's it, you can add this script to any component and add text over it.

Saturday, January 24, 2015

Notification on property change in iOS SDK

I have used QML quite a lot in my projects and there is one quite nice feature in QML that makes implementation quite easy. The feature is Property change notification.

Apple iOS SDK also similar mechanism named Key-Value Observing mechanism. Here is Apple's documentation for the same.

Following is simple code which demonstrate how we can use Key-Value Observer API to get notification on property changes. First we need to register observer and in which property observer is interested in. Code shows, class "self" is interested in property change event from propertyOwner for "isPlaying" property.
[propertyOwner addObserver:self
    forKeyPath:@"isPlaying"
       options:NSKeyValueObservingOptionNew | NSKeyValueObservingOptionOld
       context:NULL];
Now, we have registered observer for property change, we need to implement method which will be called in case of property is changed. Following code shows the same. We need to check which object sent event and for which property, then we can take appropriate action.
- (void) observeValueForKeyPath:(NSString *)path ofObject:(id) object change:(NSDictionary *) change context:(void *)context
{
    // this method is used for all observations, so you need to make sure
    // you are responding to the right one.
    if (object == propertyOwner && [path isEqualToString:@"isPlaying"]) {
        // now we know which property is modified
    }
}
When we are done and don't need notification any more we can remove observer. Below is code for the same. It's safe to use try and catch as we might get exception if we try to remove observer when none is registered.
    @try{
        [propertyOwner removeObserver:self forKeyPath:@"isPlaying"];
    }@catch(id anException){
        //do nothing, obviously it wasn't attached because an exception was thrown
    }
Now whenever "propertyOwner" changes's "isPlaying" property then "self" will get notification and "observeValueForKeyPath" method will get called.