Showing posts with label sprite animation. Show all posts

Sunday, May 3, 2015

Color Animation using Animator with Unity3D

I created a small demo application to demonstrate how Animation can be done using Animator and State Machine with Unity5. This demo creates a Blinking Animation on Mouse click.

Following is final output of this demo.


Below post shows, how above animation can be created.

-> To begin, First create a simple cube and apply a material on the cube. Setup should look like below.

-> Then using "Add Component", add Animator to this cube.

-> Once Animator is added, open Animation window using "Window" -> "Animation", We will need to use while performing the animation.


Animator performs animation using State Machine and this state machine should have default state. Animator will transit to this default State when object is created. In Animator, Animation clip is considered as a State, so lets add a Animation clip and name it default.


-> Our default state will not have any animation, it should show just initial color. Let's just add one frame with current color. Like below.


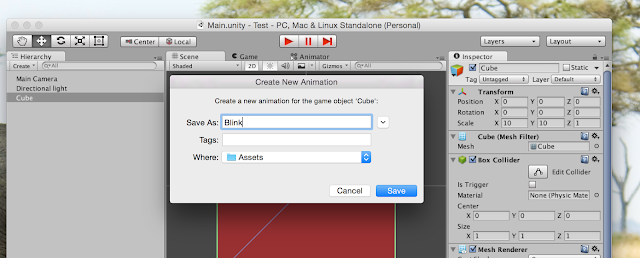
-> Now we have default state, let's add another state which will perform "Blinking" animation.


-> Now we should add frames, so let's add color property and frames to animate color.


After adding these frames color should animate like below.


-> Now we have Blinking animation state, we are now ready to create a State Machine. Open Animator window by clicking on "Animator" object, it should look like below.

-> We should now add a Parameter which will be used to Trigger animation. On "Animator" window add new boolean parameter and name it "blink".


Following video shows how to create transition and how to add condition to those transition.


-> Now we have state machine with transition and condition, but we want Blink Animation to terminate once its finished. Let's open "Blink Animation" and add Animation event line shown in below image.


This will prompt you to select function to be invoked when Animation frame is reached. You can select function from attached Script.


Following video shows the same process.


-> Finally, We also need to add a script to Cube object. Following is code for the script. In script we are setting "blink" transition parameter of Animator to true on mouse click. While StopAnimation sets "blink" parameter to false when animation event is called.

using UnityEngine;
using System.Collections;

public class MyAnimation : MonoBehaviour {

 private Animator animator;

 void Awake() {
  animator = GetComponent ();
 }

 void OnMouseUp() {
  startAnimation ();
 }

 public void startAnimation() {
  animator.SetBool ("Blink", true);
 }

 public void stopAnimation() {
  animator.SetBool ("Blink", false);
 }
}

And now if run project and click cube, you should see blink animation as per demo video. That's it hope this post will be helpful.

Saturday, April 4, 2015

Sprite with Text in Unity3D

I am working on one game where I wanted to show text over sprite. With new Unity UI System, it's quite easy to create button as sprite and text over it.

But if you want to create a traditional sprite and add text to it, this post describes the same.

Basic idea is to add 3D text component to sprite, but if you have tried it then you might know after adding 3D text component we need to move it to same sorting order as sprite. Also we need to layout text properly to set alignment.

Before we begin, I assume you know how to create Sprite, how to create 3D text component and make it a Prefab object. If not you can refer this article to know how to make Prefab object.

Finally, following is my script which I attached to Sprite. Once added to Sprite, It will create 3D text component from provided Prefab object and add the same to Sprite.
using UnityEngine;
using System.Collections;
 
public class TextScript : MonoBehaviour {
 
 public string text;
 public GameObject textPrefab;
    
 void Start() {
  GameObject text = Instantiate(textPrefab) as GameObject;
  text.transform.parent = gameObject.transform;
  text.transform.rotation = gameObject.transform.rotation;

  TextMesh textInstance = text.GetComponent();
  textInstance.text = text;

  Renderer textRenderer = text.GetComponent ();
  Renderer thisRenderer = GetComponent ();

  textRenderer.sortingLayerID = thisRenderer.sortingLayerID;
  textRenderer.sortingOrder = thisRenderer.sortingOrder+1;
 
  Bounds textBounds = textRenderer.bounds;
  Bounds parentBounds = thisRenderer.bounds;
  
  float x = gameObject.transform.position.x 
                     - (textBounds.size.x/2); 
  float y = gameObject.transform.position.y 
                     + (textBounds.size.y/2);
  textInstance.transform.position = 
                     new Vector3(x, y, parentBounds.center.z + 1);
 }
}
That's it, you can add this script to any component and add text over it.

Friday, July 4, 2014

Creating simple fade animation with Unity3D

I recently used fade animation or opacity animation with one of my Unity game, it was used to fade then earned points during game play. Initially I struggled a bit to achieve opacity animation due to confusion between using Animation or Animator. Look like from Unity version 4.3 we need to use Animator to animate the properties. I was trying to use Animation instead of Animator, was not able to perform opacity animation properly.
In this post I will show, how I accomplished the Fading animation. below is video of final effect and whole process to achieve animation.
First create a initial setup of scene. Following is how my scene looks like.

I wanted to add fading effect to 3D text, which signifies the points earned during game play. Now scene looks like below.

Now we need to add animator component to text.

Now, that we have added animator, we can go to Animation windows and setup our first key.

First key is from where our animation will start, we need to setup second key where animation will end. Create a second key at desired location and move text at appropriate location.

I also wanted to animate opacity with size and location. So lets add new curve for color animation.

Setup the opacity value for color curve for both first key and second key. Following is how my keys looks like.


Now if you press play button or play animation you will be able to see fade animation. Thanks for reading my blog.

Friday, February 21, 2014

Creating Parallax effect in Unity 4.3 2D game

I was checking out Unity3D's 2D workflow and I seen the were able to implement Parallax effect for game background without much effort.

In this post I will show I they achieved parallax effect without single line of code for Unity2D game.

Final effect looks like shown in below video.

First, I created a sample project in 2D mode and imported Sky background in asset and created a sky game object.

This is how it looks after importing Sky background.


I wanted to show clouds moving in the sky, so I created image with clouds and imported those to Unity. Now we need to create a two sprite of cloud image and put those side by side. Once that is done we need to animate both cloud background such that at end of animation second could background image is at the place of first cloud background.

To make this movement process easy, we will create a empty game object and name it Clouds.


Now we will create two object of cloud background image and place those image under empty gameobject which we just created.


We need to arrange those side by side, like below.


We can move Clouds object( the empty gameobject) and both cloud object will move together. This empty gameobject make things easier for movement and its easy way to group object together.

So, now we are ready to make parallax animation, first make sure Animation window is visible, you can make it visible like shown in blow pic.


Select the Clouds empty gameobect, we need to create initial key for animation, which is our current default position.


Once initial animation key is created, right click on time on timeline and select add key, it will add animation key, now you can move Clouds game object to create animation. This key is out intermediate animation key.


Finally, we need to add final animation key, right click on another time on timeline and add key, and move Clouds gameobject such that second cloud image is at place of first one.


We are done, now if you press play button you can see cloud moving continuously as shown in video.

Sunday, December 15, 2013

Importing Mesh and Animation from 3D Studio Max to Unity3D

In past some post I tried to show how we can perform 2D animation and collision detection.

In this post I am will show I we can import 3D mesh with animation created from 3D studio max to Unity3D and animate the same.

So lets start, I created a sample mesh with animation with 3D Studio max.


We need to export it using FBX file format, which we can easily import in Unity3D.


To import it, you can drop the created FXB format file to Asset folder in Unity3D. Once you import it click imported mesh to display its property in Inspector window. In Inspector window click on Rig tab and set animation type to Legacy.

This is required else animation will not play and you will get error "Animation needs to be marked as Legacy"


Now we can use this mesh and perform animation, you can also change its property like play automatically or loop animation.


Now lets add a script, which make model jump when pressing some button.


And here is script.
using UnityEngine;
using System.Collections;

public class JumpAnimation : MonoBehaviour {

 // Update is called once per frame
 void Update () {
  if(  Input.anyKeyDown ) {
   animation.Play("Jump");
  }
 }
}

So now its ready,if you press any button now, it should jump. Here is video how it looks.


Saturday, November 9, 2013

Collision detection with Unity3D

So by now I know how to do animation and object creation in Unity3D. Now I started to learn how to get collision detection working with Unity3D.

In Unity3D collision is detected by using various collider objects. Box collider should work for most 2D games. There are some other shapes collider also available, but that I am not going to discuss here.

So to start, I created a basic setup, one egg and one cube which will act as wall and all I want it notification when egg collides the wall.


Now we have scene setup, so for egg to be able to detect collision, go to Box Collider in inspector, and select Is Trigger option. By selecting Is Trigger, egg can move through wall but still gives us notification of collision. In this post I am going to work with Trigger only.


For collision detection to work in Unity3D, atlest one of object needs to be rigid body. so lets add rigid body to egg.


Now we are ready, lets add script which makes egg move. script looks like below.
using UnityEngine;
using System.Collections;

public class Movement : MonoBehaviour {
 
 private int frame;
 
 // Use this for initialization
 void Start () {
  frame = 0;
 }
 
 // Update is called once per frame
 void Update () {
 
  //skipping some frame to make animation look smooth
  if( Time.frameCount % 10 != 0 ) {
   return;
  }
  
  //makeing it move
  transform.position += new Vector3((-5.0f * Time.deltaTime), 0.0f, 0.0f);
  
  //sprite animation
  frame++;
  if( frame > 8 ) {
   frame = 0;
  }
  renderer.material.mainTextureOffset = new Vector2(frame*0.125f,0);
 }
 
}
Now if you run the game, you can see egg moving but to be able to detect collision we need to add following functions to the script.
 
        void OnTriggerEnter(Collider other)
 { 
  Debug.Log("Collision enterd:" + other.gameObject.name );
 }
  
 void OnTriggerExit(Collider other)
 {
  Debug.Log("Collision exited:" + other.gameObject.name );
 }

Now if you run the game, you can see logs printed when egg pass through wall. Here is how it works.

We can also detect collision with empty game object as well.Just add empty game object to scene and add Box Collider to it. That's It should work just the same.


Sunday, October 20, 2013

Beginning 2D sprite animation with Unity3D

Now that Unity is free and you can develop app for Windows phone, BB10, Android and iOS using it. I thought to give it a try.

To learn it, I started with creating simple 2D game, in which I need to switch images on object when someone touches it. It too some time to get it done first time, but finally now I know how it can be done.

So let's get started.

First we need to setup Main camera.

- I seen some videos and in one of video, author suggested to set camera at x=0,y-0, z = -10
and rotation to x=0, y=180, z=0.  I decided to use the same.

- Set camera size as 1 as its easier to deal with

- Set projection to Orthographic for 2D games.

Setup light for 2D game

We dont need to use lighting for 2D game, so we will light up whole scene by following.

Edit-> Render setting ->Ambient Light


Change Ambient light to White, It should light up whole scene

Create a cube to represent 2D object

Now we should add some object to scene.

Actually I want to render 2D image on scene, but that's not possible so we will add some 3D object and apply material over it (which is our image). And render that object to represent our image.

To do that we can add cube to scene, with proper size, Ideally we just need a plane which only one face to represent image, as that will same memory, but to learn how it works, cube will do.

Add cube to scene by Create in Hierarchy and then cube.


set position as x = 0, y = 0, z = 10

You should see a Cube in your view now.

Import image as asset

Now drag image which we need to draw to asset window,
If you want to draw animation than Image needs to be sprite sheet, I created one myself with all images i needed to be displayed.

Create material with image and apply on the Cube

We can not add image diractly to Cube, we need to create material first.
To create material,

 Project window, create ->material


Now drag image over material's texture window.


Now you can apply this material to cube, by dragging material and dropping it on cube.


Now you can see the image, but you see whole sprite sheet.  We don't want that, we need to show only one portion of sprite sheet.


Let's click material again and you will see it has tiling and offset property.

So our sprite sheet has two sprite, thus tiling will be 0.5. Let's set tiling to 0.5. Now we see proper image on cube.


If you play with offset, you can see by manipulating it we can show different sprite on cube.

By setting offset to 0.5 you can show different image on cube. We will be using this property when we add support for event, on which we will show different image.


Its showing proper image but its also showing white background, but my image is transparent. We can add transparency by selecting proper Shader.

Click material, from Shader select -> Transparent ->cutout->Diffuse


You can play with Alpha cutoff value to adjust transparency. Now it should look like below.


Handle touch event so we can animate image on touch

Now we have our 2D object, we wan to add event on it. For that we need to add script to it.

Click on object -> from Inspector window -> select Add Component -> New Script

Name it and select scripting language of your choice, I selecte c# as scripting language.

Open script, and add following code in Update method.

 void Update () {  
  if( Input.anyKey ){
   gameObject.renderer.material.mainTextureOffset = new Vector2(0.5f,0); 
  } else {
   gameObject.renderer.material.mainTextureOffset = new Vector2(0.0f,0);
  }
 }

This script will check if any key is pressed. If pressed we are setting material offset to 0.5 else 0. To display different part of sprite sheet.

OK, We are done now. Here is how it works.